BREAKING DOWN THE
BARRIERS OF THE
HP 48GX
ABSTRACT
This paper is being written with the express aim of purging the fears that a large
number of Surveyors seem to have with the HP 48
It is a follow on from a paper delivered at the recent Northern Group Conference held at
Mackay. At this stage I have no intention of going into fine detail. The aim is to enable
any Surveyor to be able to write and run simply programs on the HP 48.
COMPARISONS
The best way to start to explain the HP 48 is to compare it with the the HP 42 &
HP 41. Below you will see a table showing comparisons.
| FEATURE | HP 41 | HP 42 | HP 48 |
| Labels | yes | yes | no |
| GTO commands | yes | yes | no |
| Storage registers | yes | yes | no |
| Subroutines | yes | yes | no |
| Use of RPN | yes | yes | yes |
| Objects on stack | Only numbers | Only numbers | yes |
| Number of levels on the stack | 4 | 4 | Limited only by memory. |
This table really highlights why Surveyors have difficult with the HP 48. All the
things that we are used to no longer hold. We now have to think along different lines.
Below are listed the real strengths of the 48.
The positives are.
(1) A complex problem can be broken down into
small parts. Each part becomes a complete program in itself. It is much
easier to test a small program. Once all
the parts have been written a main program is written to run all the parts.
(2) Because the parts can be written in a general
sense, they can in turn be used in other programs. You cannot do this
with subroutines.
(3) Without Labels and GTO commands the programs are
easier to read. Proper use of loops and other techniques allow
you to get around the problems of no
Labels and GTO commands.
(4) You can create a set of storage registers. But really this is not necessary. Matrices can easily handle the storage of numbers. In the early days I did create storage registers; a move I now regret. Using local variables programs run much faster and consume less memory.
OBJECTS.
The HP 48 uses a object orientated language. It appears to have no formal name, but
there is a definite structure similar visually to Pascal. The best way to describe the 42
or 41 language is single step vertical. With the 48 there are lines of code, start and end
of loops are indented. However RPN notation is still used. Instead of just vertical
listing it is both vertical and horizontal.
Getting back to objects we will now investigate what objects are. Below is a list of some
of the objects that a Surveyor is likely to encounter and how they appear.
OBJECT TYPE
APPEARANCE ON
CALCULATOR
STRING
![]() "BEARING = "
"BEARING = "
ARRAY
![]() [ 5 16 3 ]
(Vector)
[ 5 16 3 ]
(Vector)
[[ 12 13 5 ] ( Matrix )
[ 48 25 3 ]
[ 40 20 15 ]]
PROGRAM
![]() << DEG 4 FIX CLEAR KILL
>>
<< DEG 4 FIX CLEAR KILL
>>
LIST
![]() { TOM DICK HARRY 2 }
{ TOM DICK HARRY 2 }
NAME
![]() ' TRAVERSE'
' TRAVERSE'
NUMBER
![]() 78.556
78.556
COMMON PROPERTIES OF OBJECTS
(1) All except natural numbers are contained within delimiters. eg. { }
(2) In order to be able to use later it is necessary to store each object~
(3) To store an object that is already on the stack, key in a name press ENTER then STO. The object is now stored under the name that you have given it.
(4) To use an object do the following. Press the VAR button. Objects stored are displayed. Simply press the white button under the the name of the object. If there are a lot of objects stored you may have to press the NXT button a few times to find the one you are after. Alternatively press alpha twice and key in the name ( without delimiters ) and then ENTER.
USE OF OBJECTS
Strings can be used for prompts within a program, or as part of the program output.
Arrays are used in there usual mathematical sense.
Lists are used to create menus, store numbers, for purging a number of objects at
the one time and for transferring a number of objects to an external device. If numbers
are stored then multiple manipulations of the numbers can be carried out.
Names as implied above are used to store objects, and can be used to be tagged
to numbers in output. ( The String does the same thing and is the preferred method.
A SIMPLE PROGRAM
It has been mentioned that the stack can become cluttered and chew up memory.
In order to clear the stack two commands are necessary. CLEAR and KILL.
CLEAR clears all numeric data and KILL clears all programs on the stack. The following
program does this plus a little more.
<< DEG 4 FIX CLEAR
KILL>>
In order to enter the above program do the following.
(1) Press left shift - button. << >> should appear.
(2) Enter the commands. All commands are listed in the manual on pages G-3 to G-60. Alternatively commands can be typed straight in. Press Alpha twice and key in. At the end press alpha once to get out.
(3) Press enter to put the program on the stack.
(4) Key in a name. Press enter to put it on the stack. (5) press the STO button to store. If you now hit the VAR button the program should appear in the left hand side of the menu screen.
Store this program under the name MCL. In order to run this program press the VAR button
then the white button under the name MCL. Another way of running a program is to simply
spell it out and press ENTER.
You should use this program frequently. Instead of using CLEAR to clear the display get
into the habit of using MCL.
For easy access assign this program to the key yx. The manual explains how to do this on
pages 30-4 to 30-7
VITAL KEYS
There are certain keys that are dangerous if the calculator if left on when inside a
field bag. These keys are PURG EDIT STO & HOME. Assign either programs to these keys
or functions you will use a lot. Assign to left shift centre and right shift.
REGISTER PROGRAMS
In order to create storage registers the same as the HP 42 then do the following.
(1) First create a matrix of the size of (30, 1) . You will need to use the command CON to do this, see page 14-2 in the users manual.
(2) Store this matrix under the name Regs
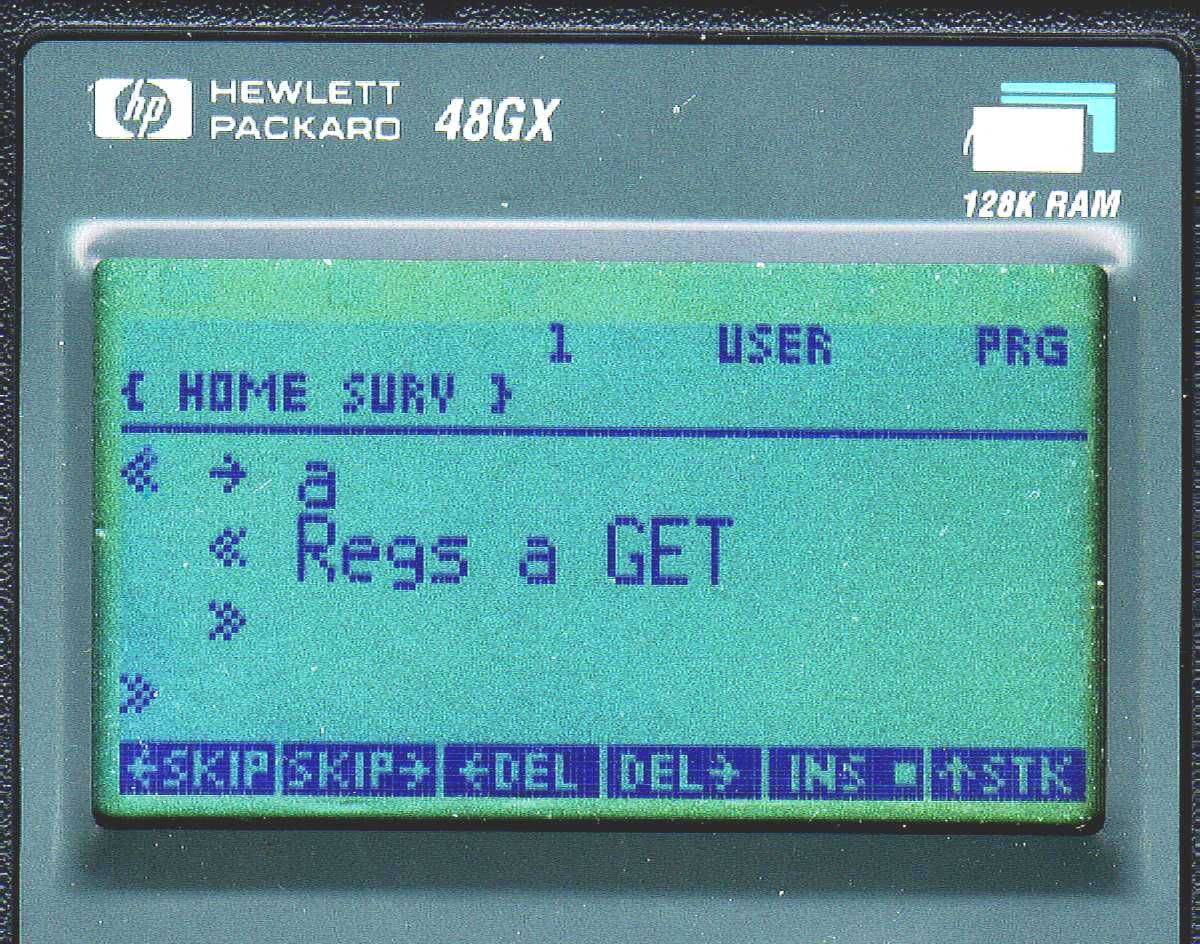
(3) Now write the two programs shown below.
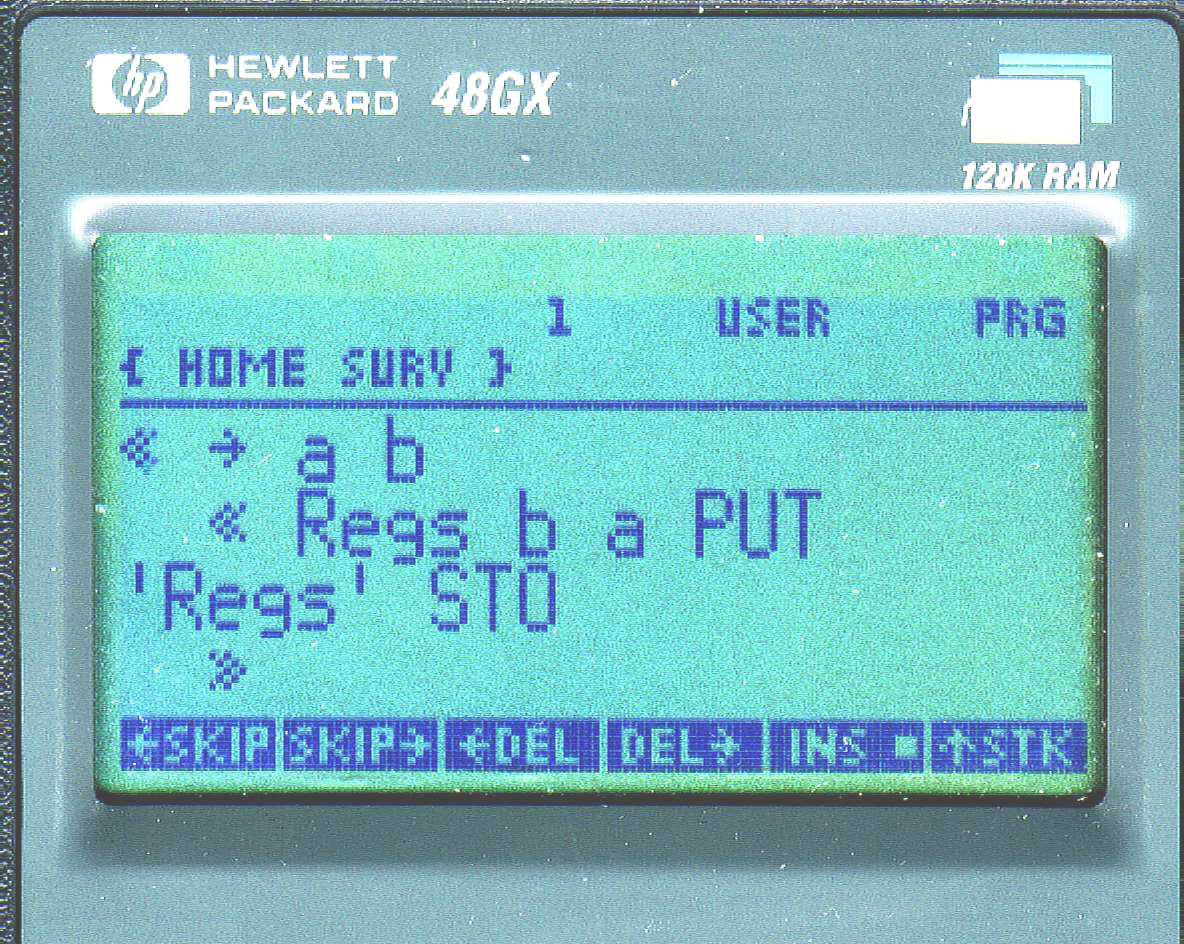
Store the above in 'STOi'
Store the above in 'RCLi'
You will notice that the program delimiters � � appear four times instead of just two.
This is because we have declared local variables at the front of the program. ie. a
& b in the STOi program. In order to run S~Oi you must have at least two numbers on
the stack. Suppose we have the following numbers on the stack.
45
12
Then 12 will be stored into a and 45 into b. In terms of registers 45 will be stored into
register 12.
If you now place 12 on the stack and run RCLi the number 45 will be returned.
In order to get the delimiters in there right place; do the following.
Press the delimiter button. Key in right shift 0 ( arrow symbol) then a b. Then simply press the delimiter button again. Now key in the main body of the program.
The program STOi takes two numbers from the stack and stores them in the variables a &
b. The main body of the program places the number to be stored at the register specified.
See User Manual page 14-7 for details on the command PUT.
RCLi only needs one number on the stack. ie. the register that contains the number to be
recalled. Page 11-1 in the user manual will also give details of the use of the command
GET.
VARIABLES
There are three main types of variables. These are listed below.
(1) Local variables. They are the type used in the register programs. They have to be
declared at the start of the program and must be lower case. There main advantage is that
they are temporary. Once the program has run the variables vanish.
(3) Global variables. As the word global implies they can be used at any time. They are
usually capital letter or combination of capitals. Once created they remain forever until
you purge them.
(4) Compiled Local variables. These are variables that can be shared by more than one
program. Complied local variables looks like the examples below.
In order to use complied local variables the program that creates the variables must be on
the stack. Once MCL is pressed the variables vanish.
SUMMARY ON VARIABLES
USE LOCAL VARIABLES AS MUCH AS POSSIBLE. PROGRAMS RUN FASTER AND LESS MEMORY IS USED.
COMPILED LOCAL VARIABLES ARE GOOD FOR CLOSE TYPE PROGRAMS. THAT IS BECAUSE THE PROGRAMS
ARE INTERRELATED.
USE STOi AND RCLi PROGRAMS SPARINGLY.
LOOPS.
There are 11 different types of loops I have only used 4 . The four are listed below.
IF.. .THEN...END
IF.. THEN...ELSE... END
FOR.. NEXT
DO.. .UNTIL...END
The DO loop is the one I use most frequently. I have only used the FOR loop a few
times. See page 29-10 in the manual.
I have a standard approach that combines the DO loop with the
IF....THEN....ELSE..... END loop. ( See below.)
INITIALISATION
::
DO SET UP TEST STORE SAY b
IF b P =
THEN MAIN BODY OF PROGRAM
::
ELSE b
END
b P =UNTIL
END
The above uses P as
the test number. If you want get out of the loop then press P as an input at the top. This will take you
straight out.
MENUS
MENUS ALLOW EASY ACCESS TO PROGRAMS.
TWO MAIN TYPES OF USER MENUS
(1) CUSTOM MENU. FOUND BY PRESSING CST
(2} TEMPORARY MENU. ( TMENU)
The CST menu is used for storing groups of heading. ( See page 30-1 in the manual.)
programs under a common
TMENU is used to gain access to the programs held under the common heading shown in CST. (
See page 30-4 in the manual. )
CST Menu
| START | BASIC | SPEC | FIELD | MISC | SETTS |
![]()
| TRAV | CO-IN | BBS | DDS | DIV | CONT |
Note the first menu above is the CST menu. Each item in this menu leads to groups of
programs. Press BASIC and the second menu appears. The program for BASIC is listed below.
Note the use of a list then the command TMENU.
PROGRAM "BASIC"
<< { TRAV CO-IN BBS DDS DIV CONT } TMENU >>
FINAL HINTS
(1) Use Names that mean something to you for main programs . eg. TRAV for traverse
input.
(2) Limit names to 4 characters only. Use only capital letters.
(3) For sub programs develop a system for naming. eg for curve sub programs I use Cl, C2,
C3 ect. For Astro. programs I use Al, A2, A3 ect.
(4) Keep good records of all programs. A spreadsheet is ideal for this. By my latest count
I have over 190 programs. So they do mount up quickly and if you do not keep records you
will soon lose track.
(5) Matrices are a good way to store data. However if you have a program that recalls data
from a matrix many times you will run the risk of running out of memory. Each time you
recall a matrix it is placed on the stack. It will remain on the stack until you clear it.
Therefore huge amounts of memory will be lost by continually recalling a matrix.
The solution is simple. After you have recalled the matrix and extracted the information
you want place the command CLEAR in the program.